Best Export Settings of Lightroom App in 2025
Best Export settings of Lightroom app is little bit confusing task for few user, but you don’t need to worry about this, today in this article we will discuss about the best export settings for Lightroom app, Image resizing for social media, Color Spacing and best export settings by applying these settings, you will be able to get maximum resolution results without losing quality of picture & videos.
Best Lightroom Export settings for social media
(Instagram, Facebook, TikTok)
Lightroom App Export Settings for Instagram
- First Step is to Downlaod Lightroom app
- Choose Location ( where you want to save the File)
- Set File Name to Avoid confusion while finding that specific picture
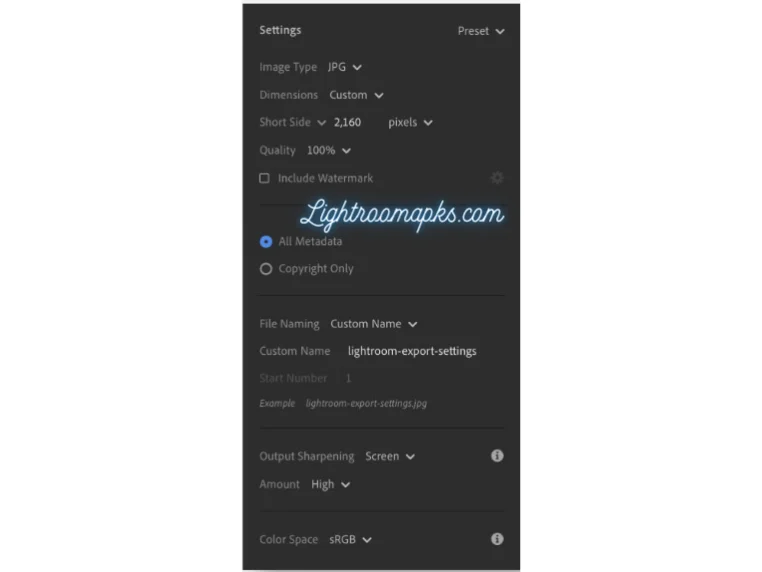
- Set File Settings (For maximum performance we choose JPEG + RGB Color Space + Set Quality to 85%)
- keep Sharpness as it is
Output Sharpening: Screen - Quality: 100%
- Amount : High
- Color space: sRGB
- Metadata ( Keep Default settings)
- Watermark (you can use if you want).
Pro Tip:
Instagram may shows you the width of about 1080p by default, but as per my experience, you can take advantage here, change the width from 1080 to 2160 and leave the height option empty, after doing this, you can see the a good change in the resolution of picture instead of putting the width to 1080p, keep the width 2160p.
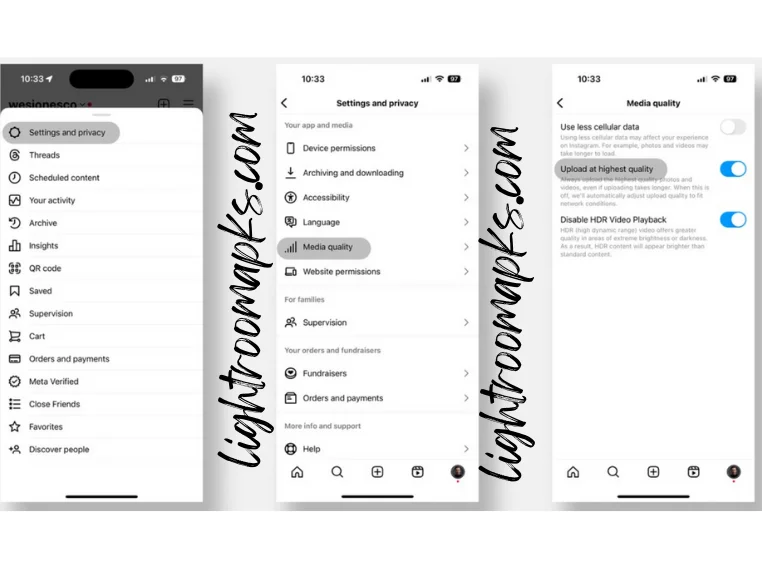
Instagram app settings
after adding complete settings in the Lightroom app, now we have left the settings of Instagram, for this open the Instagram app > Go to Privacy policy settings of app > Open Media Quality > Change it to upload up to the Highest Media quality.
By Doing so , you can upload the images in Highest quality without losing the quality of image.
Lightroom app Best export settings For Facebook
By Applying all of these settings while exporting your images from Lightroom app, you will be able to get the High Quality images without losing the quality of images, so follow these simples steps and enjoy the High Quality Images and upload the highest quality images to Facebook.
Steps for Exporting Highest Quality Images from Lightroom to Facebook
- Set Image Quality to 100%
- Color Space: sRGB
- Limit File Size Check: Keep This Uncheck
- image Format Type: JPEG.
Image Size
- Resize the image to “Fit”
- keep Pixels up to Maximum: 2160p.
Lightroom Best Export Settings For TikTok
Here are Few simple steps, by following these steps you will be able to upload the Highest Quality images of Lightroom app on TikTok Video.
Steps for Exporting Highest Quality Images from Lightroom to TikTok
- After Completing Video or picture editing Click on export and add these settings
- Choose Location ( where you want to save the File)
- Set File Name to Avoid confusion while finding that specific picture
- Set File Settings (For maximum performance we choose JPEG + RGB Color Space + Set Quality to 85%)
- keep Sharpness as it is
Output Sharpening: Screen - Quality: 100%
- Amount : High
- Color space: sRGB
- Metadata ( Keep Default settings)
- Watermark (you can use if you want).
Best Lightroom Export Settings For Print
There are Following Steps , by Following these steps you will be able to Export the images of High Quality Without losing the Quality of images.
- Set Location: Set the location where you want to save the Files in your PC or Mobile
- Insert the File Name For Convince, So you can find out the files easily
- File Format: Set the File Format to TIFF + sRGB + Quality 100%
- Image Size Ratio: Disable This option and edit your images in Free form + Maintain the Resolution at 300 PPI.
- Sharpening: Select Glassy or Matte Sharpening as per your choice
- Metadata: Keep it Default
- Watermark (Last Step) : Keep it uncheck, so you can export the images + Videos without watermark.
Best Lightroom Export Settings For Website
There are Following Steps , by Following these steps you will be able to Export the images of High Quality and upload them on any website Without losing the Quality of images.
- Set Location: Set the location where you want to save the Files in your PC or Mobile
- Insert the File Name For Convince, So you can find out the files easily
- File Format: Set the File Format to TIFF + sRGB + Quality 100%
- Image Size Ratio: Disable This option and edit your images in Free form + Maintain the Resolution at 80 PPI.
- File Settings: Keep the Files to WEBP Format, which will leads to Fast loading + keep the Quality of image 100%
- Sharpening: Select Glassy or Matte Sharpening as per your choice
- Metadata: Keep it Default
- Watermark (Last Step) : Keep it uncheck, so you can export the images + Videos without watermark, (Click on Mark button to keep the watermark).
How to Access The Export Dialog In Adobe Lightroom App:
Access The Export Dialog In Adobe Lightroom Classic App For PC:
- Click on image you want to export and a pop up option will appear
- Move the cursor in Drop down menu and Click on Export Option
- After Clicking on Export Button, Few Basic Settings Will Appear, Adjust the Settings as per your requirement’s and Click on Export.
Access The Export Dialog In Adobe Lightroom App For Mobile:
- Click on + Button, Import and Edit the Image or video
- After importing, Edit the image as per your choice
- After editing and finalizing images , Videos Click on Export Button and enjoy.
Keyboard Shortcut for Exporting Files:
For Windows: Press Ctrl + Shift + E
For Mac: Press CMD + Shift + E.
Choosing the Right File Format Settings
Choosing the Right Format settings plays important role while Exporting the images in High Quality, We will Discuss Few Important and Basic Files Formats, which you can choose as per your choice.
There are about 4 basic File Format, which you can choose:
- JPEG (Joint Photographic Experts Group)
- TIFF (Tagged Image File Format)
- PNG (Portable Network Graphic)
- DNG (Digital Negative).
JPEG (Joint Photographic Experts Group)
Best For: Online Sharing + Social Media Sharing + General Editing Use
Pros : Compressed + Less File Size + Best Image Resolution
Compatibility: Compatible for all devices and social media platforms, including Facebook, Instagram ,TikTok, Snapchat.
TIFF (Tagged Image File Format)
Best For: For Banners, Company professional wall panels, Printing purpose
Pros : maintenance of Maximum Quality image
Compatibility: Compatibly with Higher processer Devices for Maximum Performance, Professional Software of Adobe (Photoshop, Corel Draw, inpage, After effects, premium pro)
DNG (Digital Negative)
Best For: For Saving files in Archive Form and using them later, Most commonly used for Adobe Ecosystem.
Pros: Best For Archiver Confidence + Able to open RAW Files More Easily + Occupy Less Memory
Compatibility: Highly Support Adobe Software (After Effects, Photoshop, Premium Pro) And Other Professional Software’s.
Before Selecting Any Format Make sure, What is your Preference size, quality, or both & platform, where you are going to upload these files, WEBP which is Highly Recommended for uploading on website, while PNG for Social Sharing without Losing the Quality of image, While JPEG is Small + Compressed + Less Quality Image Files.
Image Quality Settings
While Selecting the Quality of the Image keep in mind that the Higher the Quality of the image higher the size of the file, For Example, we have two File Formats PNG & JPEG, in which PNG has a Higher Size and Image Quality as compared to JPEG.
For Instagram: Use PNG Format For Sharing the Image, And Keep the Quality of image up to 100% For Better Resolution.
For Print: Use JPEG File Format and quality 100% and unmark the resize option.
Pro Tip: as per my experience, if you are conscious about the space of your mobile or laptop space, then you should have to go for JPEG Fil Format and Select the size of the image to 80% as compared to 90%, but there is no more noticeable difference in the quality resolution of the image.
File Size Limits For Social Media Platforms:
| Platform | Max Image Size | File Dimensions | Max video Size |
| 4 GB | Image Posts: 1080 px (bottom edge) Landscape: 1080 x 608 px. Portrait: 1080 x 1350 px (4:5 aspect ratio). | 4 GB | |
| 4 GB | Image Posts: 1200 px (bottom edge). Portrait: 1200 x 1500 px (4:5 aspect ratio). | 4 GB | |
| TikTok | 50 mb | Video: 720 x 1280 PX. Video ads: 540 x 960 PX | 500 mb |
| Printer | 10 mb | Image Posts: 1080 px (bottom edge) Landscape: 1080 x 608 px. Portrait: 1080 x 1350 px (4:5 aspect ratio). | 77 mb |
Output Sharpening Settings
in sharpening section, you will have to find out the dropdown option, select the intended output, you can set the Screen option for web purposes, or any other option depending on your requirements
Amount: Adjust the slider as per your requirements to put the amount of intensity for sharpening.
According to my experience, while adjusting the sharpening select the Screen mode and put the intensity to standard.
File name
While Exporting the images or video , at the last step, you have to add the file name to save it with proper name in your system, so you can import these files easily without disturbing the work follow and find the files easily for later use.
you can add your brand watermark on your projects like videos and images, to Promote your brand. if you don’t want to add the watermark, just uncheck the watermark option while exporting the files, and enjoy watermark-free images and videos.
Metadata
while exporting the files, you can add the additional information, like Files name, description of files, keywords, which may increase the visibility, accessibility, and copyright credit to your work. you can skip this option if you don’t want to add metadata details on your files.
Transferring Photos from PC To Phone
Transferring photos while maintaining the quality of the image is also a confusing task, which can be achieved by the different methods by uploading them on different platforms or directly transferring using data cables.
Transferring Files from PC to Android mobile:
While Transferring the photos or videos, without losing the quality of files, and marinating them up to maximum level, you can use different platforms for uploading and then download later with the help of links.
Here are a few files uploading platforms while keeping the quality 100%
- WhatsApp (Login your WhatsApp on your PC and upload the images or video in Files Format For Max quality)
- MediaFire
- Google Drive
- Drop Box
Best Fast and Easy Method: in my opinion just plug in the USB Cable to your mobile and PC and Transfer the files easily without losing the quality.
Transferring Files from PC to iPhone (iOS):
For Transferring photos + Videos from PC or MAC to iPhone without losing the quality of content, which is also the most commonly asked question, for this purpose you can use the different media uploading platforms which are mentioned below:
- WhatsApp (Login your WhatsApp on your PC and upload the images or video in Files Format For Max quality)
- MediaFire
- Google Drive
- Drop Box
- Login your iCloud to your PC or MAC and upload these files to iCloud
- Airdrop
Best Fast and Easy Method: in my opinion just plug in the USB Cable of your iPhone and connect it to your MAC Book and transfer the files easily without losing the quality.
After completing the video or photo editing on your mobile phone, Click on the Export button which is located at the Right Side of app, select it and make the further changes which are mentioned below:
- Choose Location ( where you want to save the File)
- Set File Name to Avoid confusion while finding that specific picture
- Set File Settings (For maximum performance we choose JPEG + RGB Color Space + Set Quality to 100%)
- keep Sharpness same as it
- Output Sharpening: Screen
- Quality: 100%
- Amount: High
- Color space: sRGB
- Metadata ( Keep Default settings)
- Watermark (you can use if you want).
Conclusion
All of the best Export settings for different social media platforms are mentioned above with complete details, set the settings according to your requirements, and enjoy the photos and video in maximum quality, as per my experience my fav method to transfer files is using the Cable or WhatsApp Files Transfer Mode or Google Drive.